Screen Recorder is a powerful software designed for high-quality screen recording. This guide provides comprehensive instructions on how to effectively utilize Screen Recorder for various recording needs, including video, audio, gameplay, Webcam, phone screen, video/audio editing, and more.
Start by downloading and installing Screen Recorder on your computer. Launch the software and register it to continue.
- Part 1: How to Record Video on Your Computer
- Part 2: How to Record Audio on Your Computer
- Part 3: How to Record Webcam on Your Computer
- Part 4: How to Record Gameplay on Your Computer
- Part 5: How to Record Phone Screen on Your Computer
- Part 6: How to Edit Video and Audio Recordings
- Part 7: How to Schedule Automated Recordings
- Part 8: How to Take Snapshots on Your Computer
- Part 9: How to Adjust Recording Preferences
Part 1: How to Record Video on Your Computer
Step 1: Select Video Recorder Mode
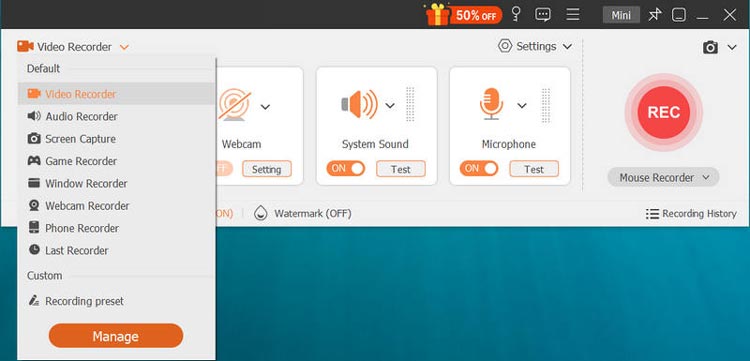
Launch the software, and choose the "Video Recorder" mode located at the top left of the interface. This allows you to record both video and audio simultaneously, making it ideal for tutorials and presentations.
Step 2: Customize Your Recording Area
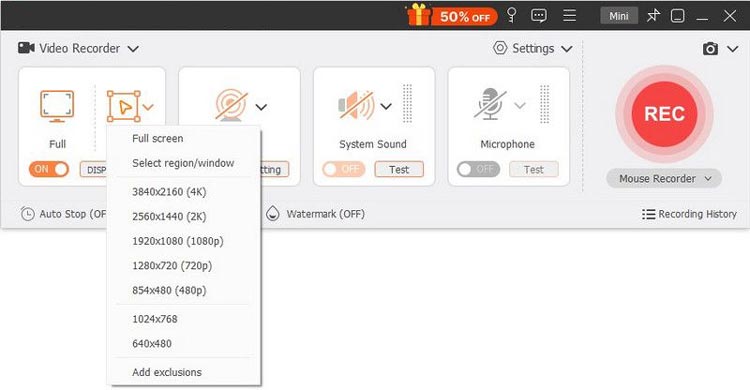
Click on "Custom" to select your recording area. You can opt for full screen or choose a fixed resolution such as 3840×2160, 2560×1440, or others. Alternatively, by clicking "Custom" > "Select region/window", you can draw a specific area using your cursor, allowing for precise control over your recording.
Step 3: Choose Audio Sources for Your Recording
Select your audio sources by toggling the "System Sound" and "Microphone" options. For general recordings like videos, audio, and lectures, enable only the System Sound. For games, webinars, or tutorials, you may want both options active.

Tips: You can adjust microphone settings for noise cancellation and enhancement to ensure optimal audio quality.
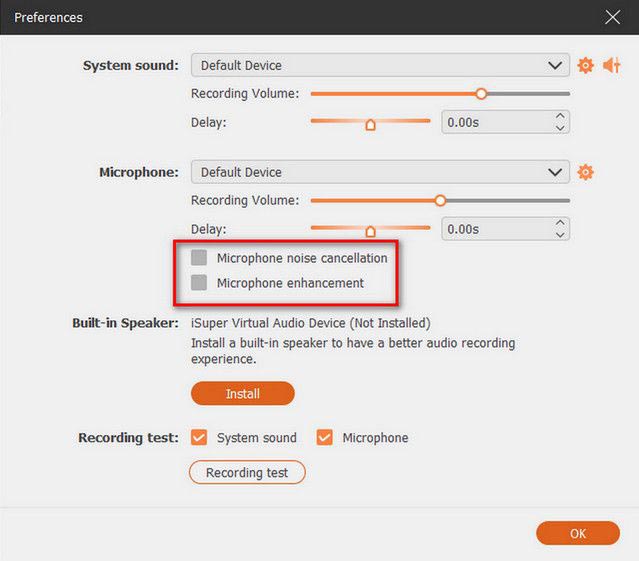
(1) When you activate the microphone audio recording, click on "Settings" in the dropdown next to it.
![]()
A new window will open, allowing you to enable "Microphone Noise Cancellation" and "Microphone Enhancement". You can also change the microphone source and select different microphones for recording.
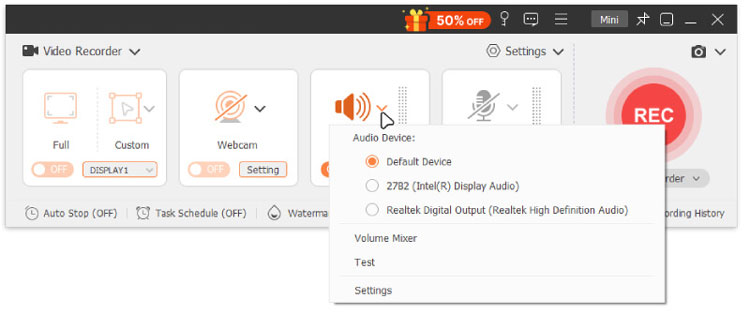
(2) If you wish to record audio from your computer speakers, click on "System Sound", and the dropdown menu will display the option for your computer speakers.
Step 4: Start Screen Recording
Click the "REC" button to begin your screen recording. You can edit the video in real-time by adding text, lines, or arrows. After finishing, preview your recording and click "Export" to save it to your desired location.
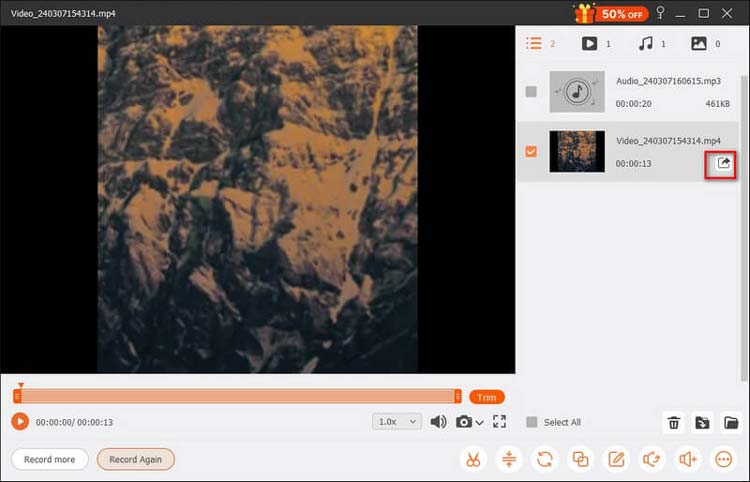
Note: All your video and audio recordings are stored in the Recording History list. Click on "Recording History" at the bottom to view, edit, or delete your recordings.

Part 2: How to Record Audio on Your Computer
Step 1: Access Audio Recorder Mode
Open Screen Recorder and select the "Audio Recorder" mode to enter the audio recording interface. This mode is perfect for capturing voiceovers or music.

Step 2: Configure Your Audio Settings
Choose between "System Sound" or "Microphone" input based on your recording needs. If you want to capture only your voice, disable System Sound. For capturing both your voice and computer audio, enable both options.

Ensure that the Microphone noise cancellation and enhancement options under Settings are activated for better audio clarity.
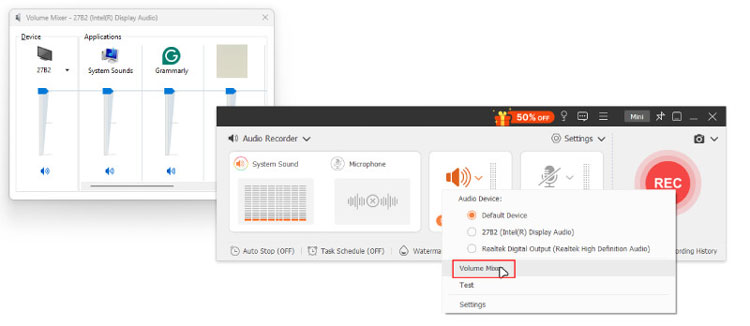
Additionally, you can click on the "Volume Mixer" in the System Sound drop-down menu to adjust the audio levels for individual applications while recording.
Step 3: Save Your Audio Recording
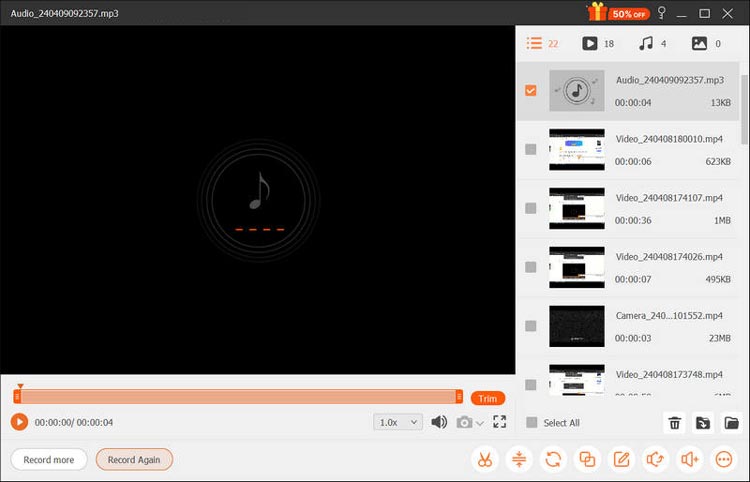
After completing your audio recording, click the "Stop" button. You will then be taken to the Preview window where you can listen to your recording, and click the "Export" button to save your audio file to your computer.
Part 3: How to Record Your Webcam on Computer
Step 1: Access Webcam Recorder Mode
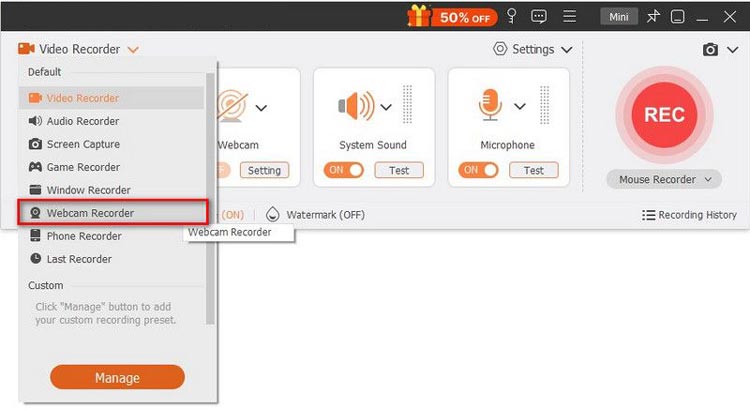
Open Screen Recorder and select the "Webcam Recorder" mode to start capturing video from your camera. This is useful for creating video messages or tutorials.
Step 2: Adjust Camera Settings
In the preview window, configure your camera settings, including source camera, camera effects, image rotation, resolution and volume. Hit the "Record" button to start capturing your webcam video.
Step 3: Manage Your Recording
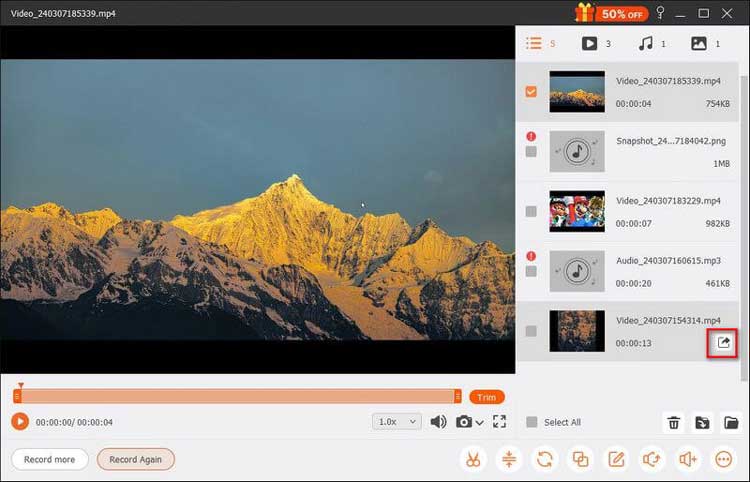
You can pause or stop the recording at any time. Additionally, by clicking the Camera button on the floating bar, snapshots can be taken during the session for quick captures.
Step 4: Export Your Webcam Video
After recording, preview and trim your video as required, then select "Export" to save it in your preferred format.
Part 4: How to Record Gameplay on Your Computer
Step 1: Launch Your Game
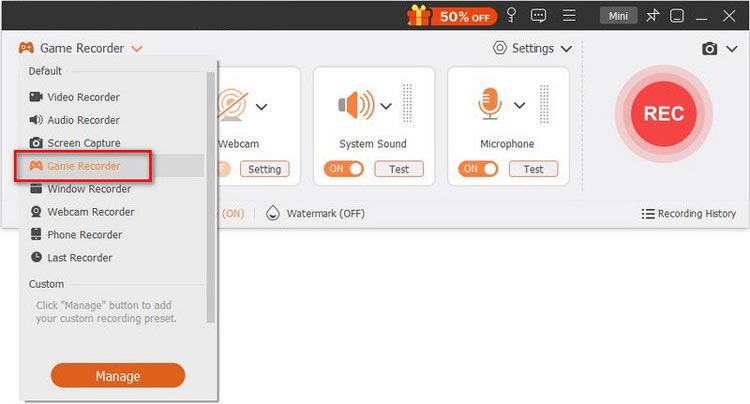
Start the game you wish to record and open Screen Recorder. Select "Game Recorder" to capture your gameplay, ideal for gamers looking to share their experiences.
Step 2: Select the Game to Record
In the Game Recorder interface, choose your running game from the dropdown list. The recording area will automatically adjust based on the size of your game window.

Step 3: Enable Webcam for Reactions
If you want to capture your reactions while gaming, enable the "Webcam" option. You can also toggle audio settings as needed to include your commentary, i.e. System Sound, Microphone.

Step 4: Begin Recording Your Gameplay
Click the "REC" button to start recording your gameplay. While recording, you can use the toolbar features for snapshots, setting the recording length, and accessing editing tools as needed.

Step 5: Finish Recording and Save
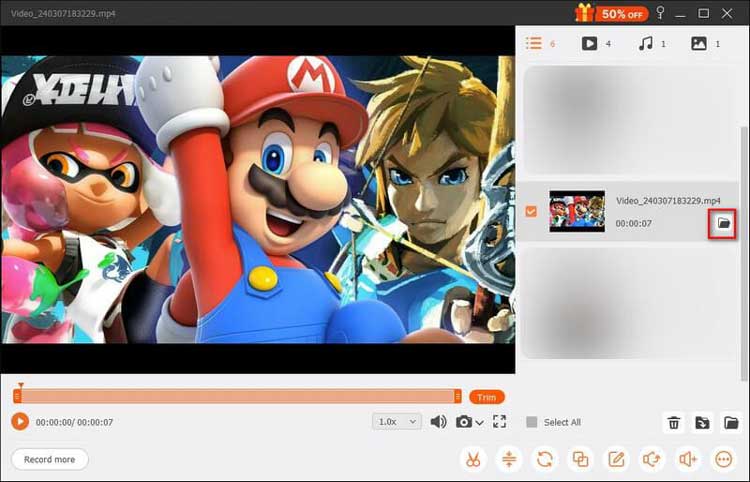
Once done, click "Stop" to end the recording. You can preview your gameplay, clip it if necessary, and click "Export" to save your file to your computer.
Part 5: How to Record Phone Screen on Your Computer
Step 1: Select Phone Recorder
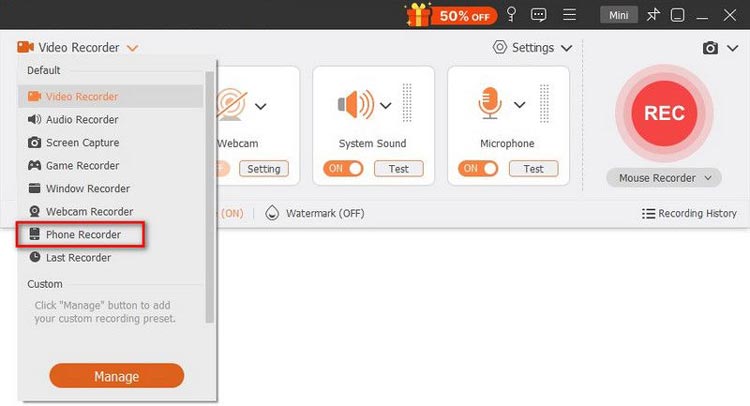
To record your iPhone or Android screen, launch Screen Recorder and select "Phone Recorder" from the main menu. This feature allows you to capture mobile gameplay or app tutorials.
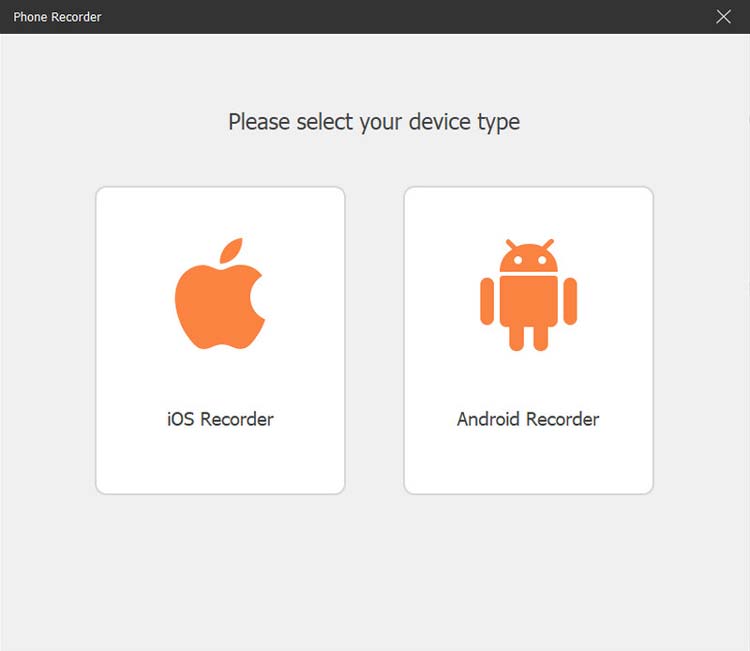
Step 2: Choose Your Device Type
Select either "iOS Recorder" or "Android Recorder" based on your device. For iPhone users, ensure your screen is mirrored to the computer first. Android users can connect via WiFi or USB.
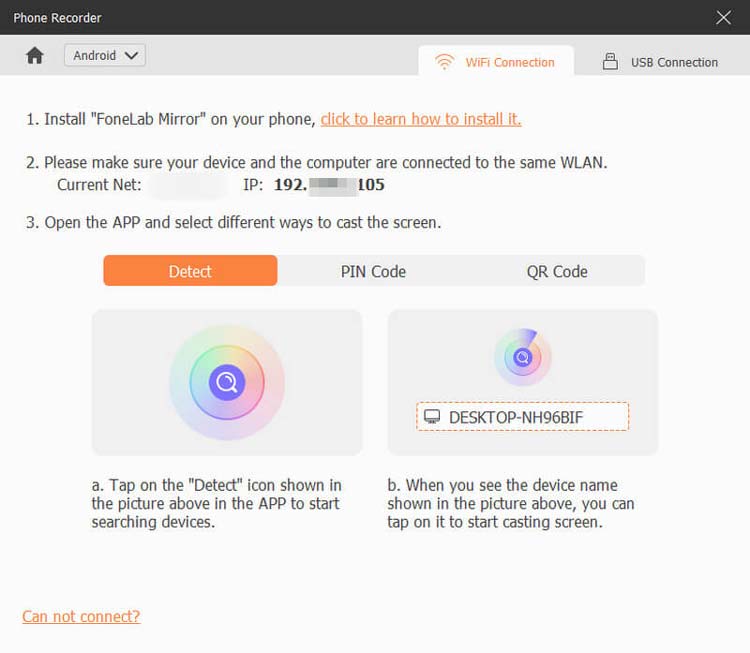
Step 3: Mirror Your Device to the Computer
For Android, you can use either the PIN Code or QR Code methods for WiFi connection.
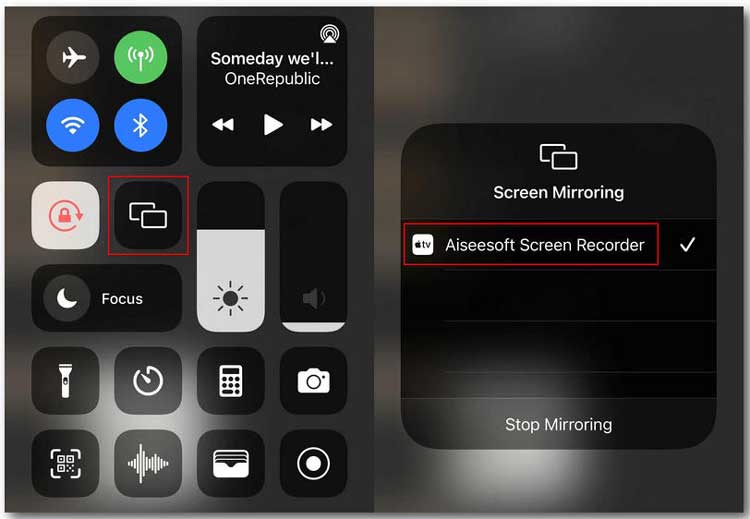
For iOS, ensure both your iPhone and computer are connected to the same Wi-Fi network. Next, swipe down from the top of your iPhone to access the Control Center. Locate the "Mirror" button and select "Aiseesoft Screen Recorder" as the output device.
Step 4: Start Recording Your Phone Screen
Once mirrored, you can record your phone screen directly on your computer. After recording, preview and edit your video as needed, then click "Export" to save it.
Part 6: How to Edit Video and Audio Recordings
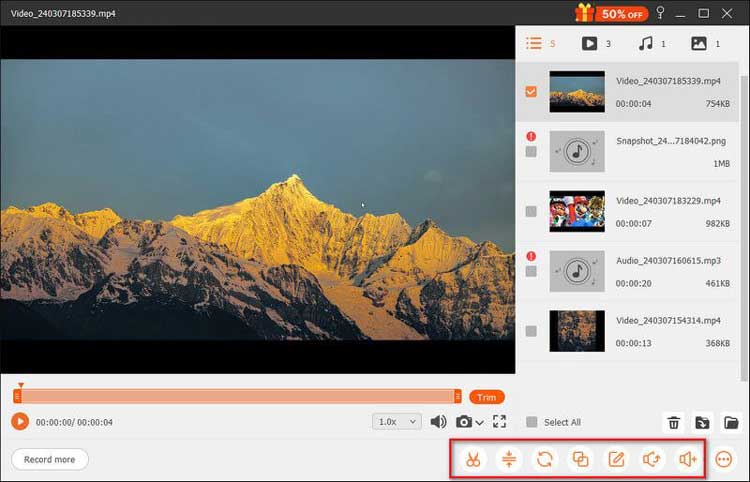
After saving your recordings, you can further edit them using tools like the Advanced Trimmer, Video Compressor, Media Converter, File Merger, Edit Media Metadata, Sound Extractor, and Sound Booster. These features allow you to trim, compress, edit, and convert your files into various formats, ensuring your recordings meet your needs.
Advanced Trimmer
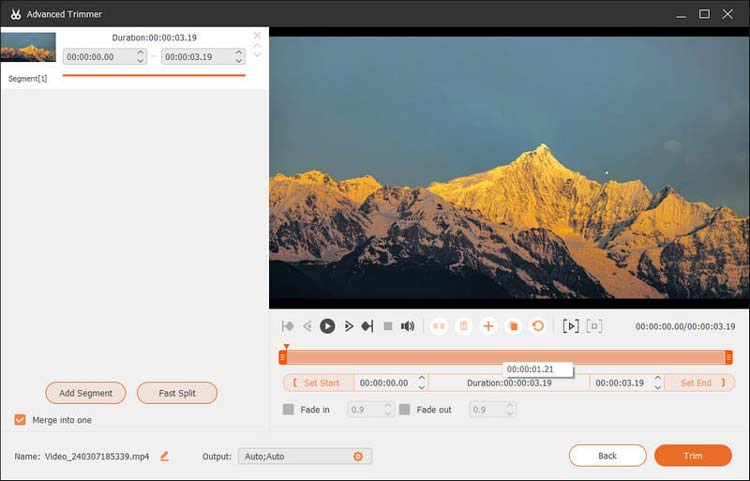
To trim your recording file, you can select Advanced Trimmer feature from the bottom right toolbar to start trimming. Click "Trim" to confirm and export the file to your computer.
You have two options to trim your recording file:
-
Add Segment: Adjust the processing bar to create a segment, copy and paste a clip, or split a file.
-
Fast Split: Divide one recording into multiple parts by file size or duration.
File Merger
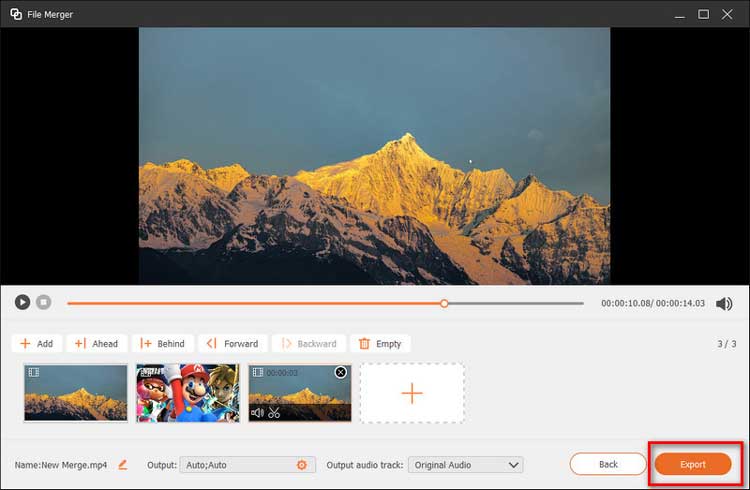
To merge multiple clips into a single file, find the File Merger option in the toolbar.
You can use the plus button to import photos, videos, or audio files from your recording history or your local computer. Once all segments are prepared, click the "Export" button to save the combined file to your computer.
Video Compressor
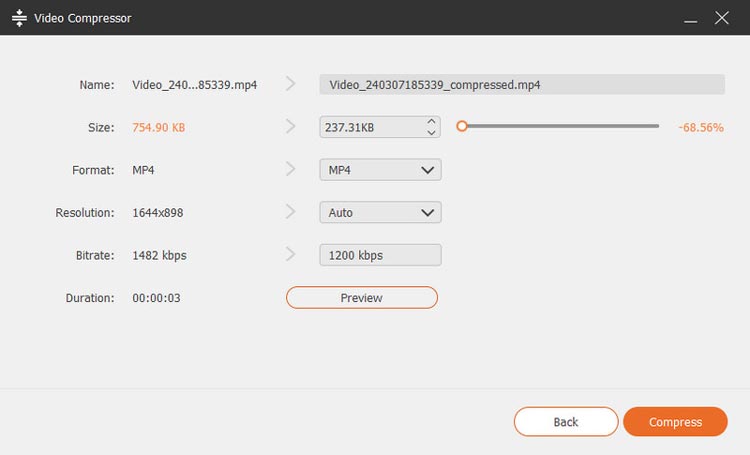
Compress large files using the Video Compressor feature to reduce their size while maintaining quality. Simply adjust the file size slider to select your desired video size for saving.
Media Converter
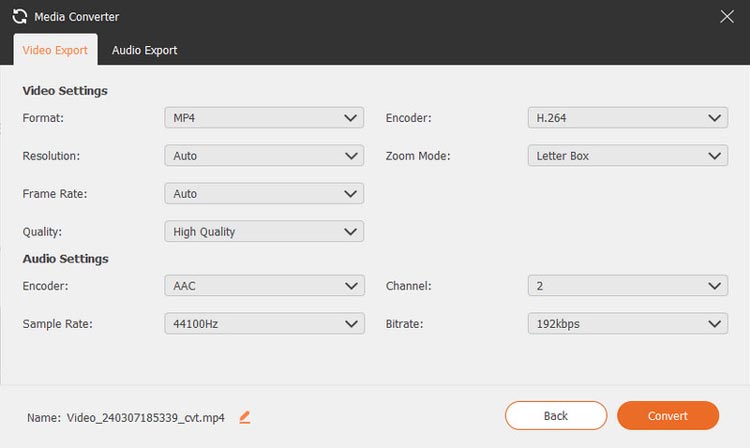
Using the Media Converter tool, you can convert your recorded videos into different formats such as MP4, GIF, MOV, etc. Adjust settings like resolution and frame rate, video/audio encoder, and more.
Edit Media Metadata
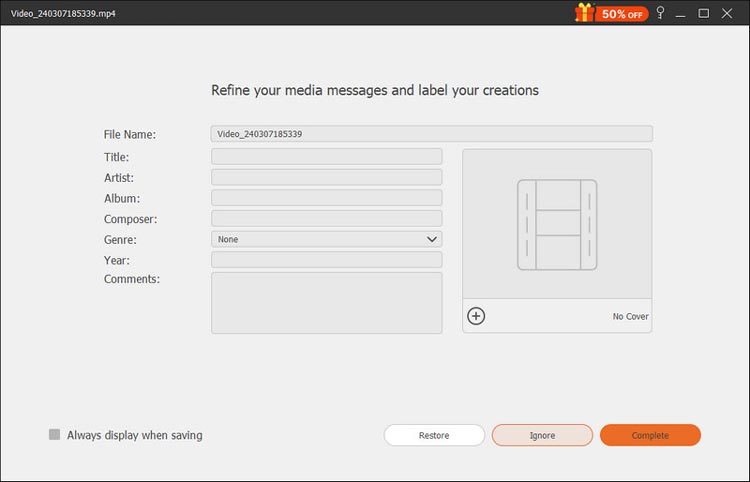
Using the Edit Media Metadata feature, you can personalize your exported video or audio files by modifying the media metadata. This includes adding details such as the file name, title, album, composer, genre, year, comments, and a cover image for the video or audio.
Sound Booster
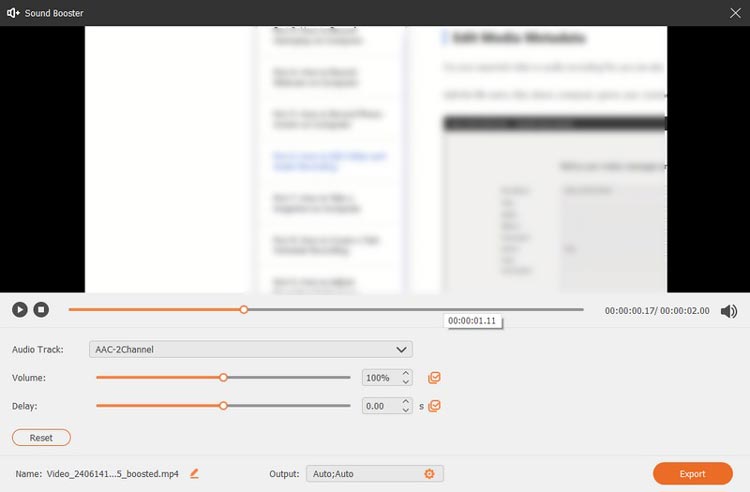
Another useful audio tool for your recorded video is the Sound Booster. It primarily allows you to adjust the volume or timing of the audio. Additionally, you can select specific audio tracks to enhance the overall sound quality.
Sound Extractor
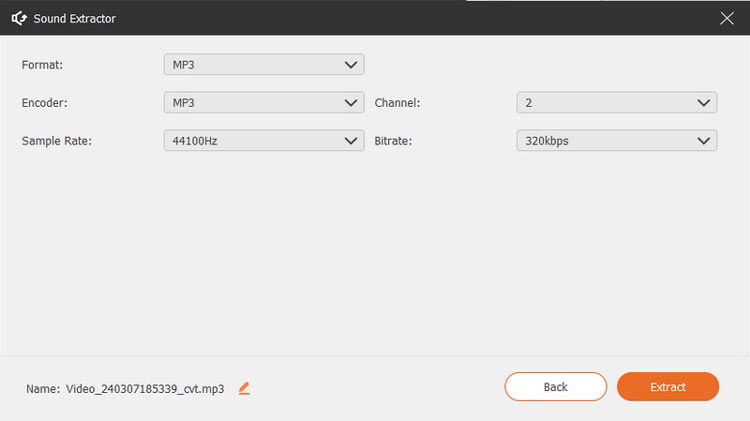
If you need only the audio from your recorded video, the Sound Extractor is a specialized tool that enables you to choose the audio format, sample rate, bitrate, and more.
Part 7: How to Schedule Automated Recordings
Step 1: Access Task Schedule
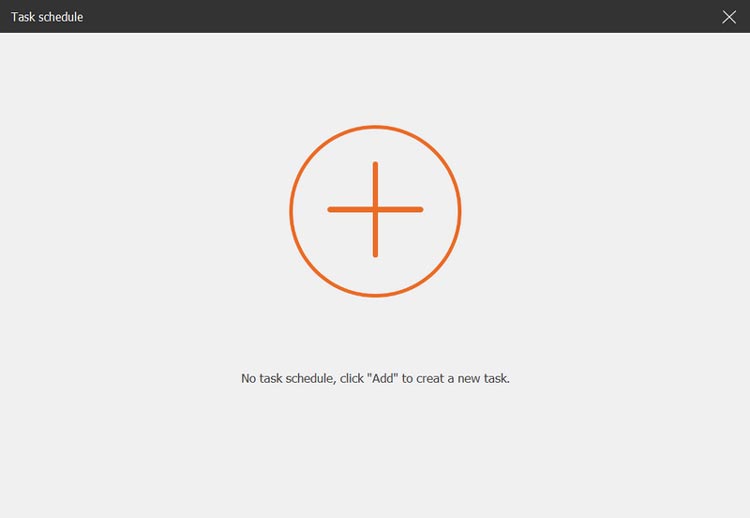
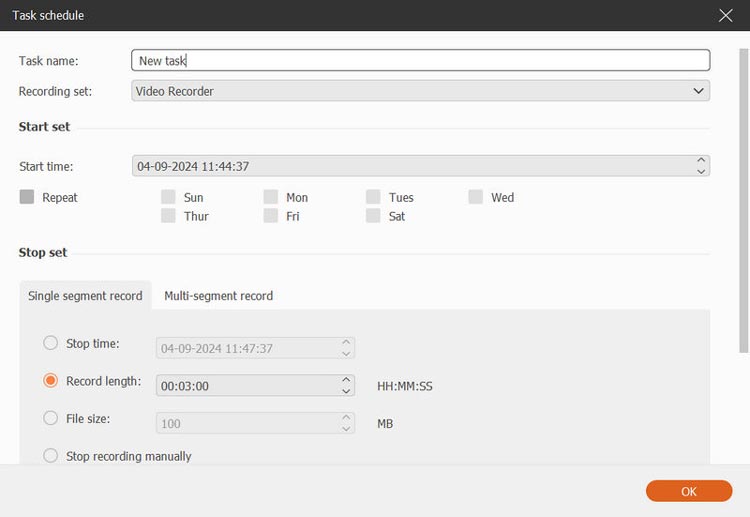
Click on "Task Schedule" at the bottom of the interface to set up a recording schedule. This feature is great for automated recordings.
Step 2: Create a New Task
Add a new task by clicking the plus button, entering a name for the task, and setting the recording parameters such as start time, end time, recording length, and recording settings.
Part 8: How to Take Snapshots on Your Computer
Step 1: Capture a Screenshot
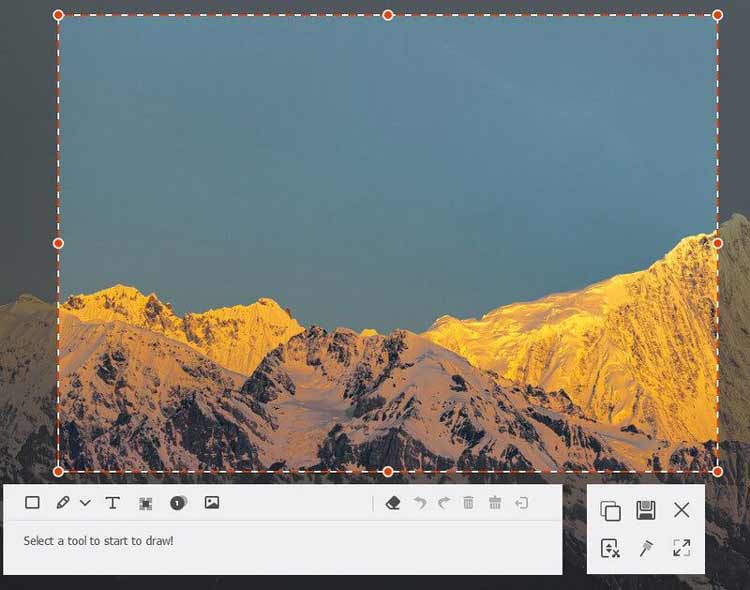
Click the camera icon in the main interface to start taking a snapshot. This feature is useful for capturing important information or images from your screen.

Step 2: Set the Screenshot Area
Define the area you want to capture and add any labels or annotations for clarity, such as like rectangle, circle, line, arrow, text, and color paints.
Step 3: Save Your Snapshot
After editing, click "Save" to store your image in the desired format, ensuring you have a record of your important screen content.
Part 9: How to Adjust Recording Preferences
For optimal recording quality, navigate to the Preferences menu to adjust various settings such as output format, sound sources, and hotkeys. Customize your experience for the best results.
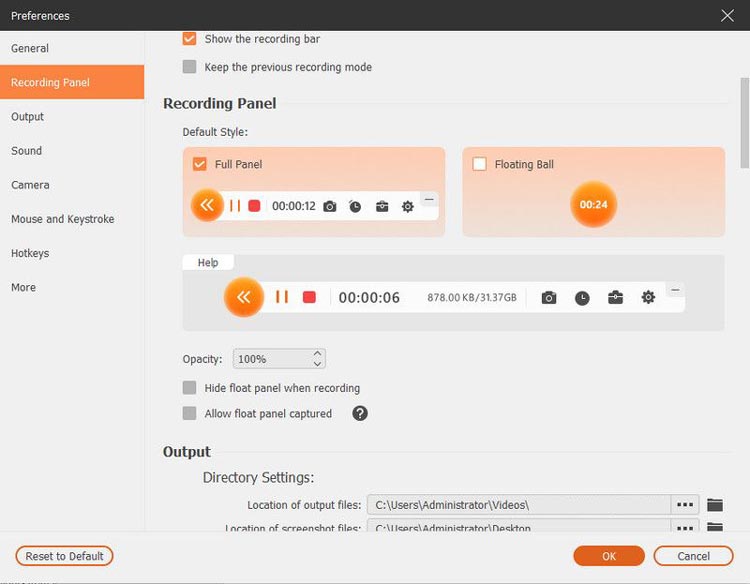
Recording Preferences
The Recording Panel allows you to customize various settings to suit your preferences, such as adjusting opacity, hiding the floating bar during recording, and enabling the capture of the floating panel.
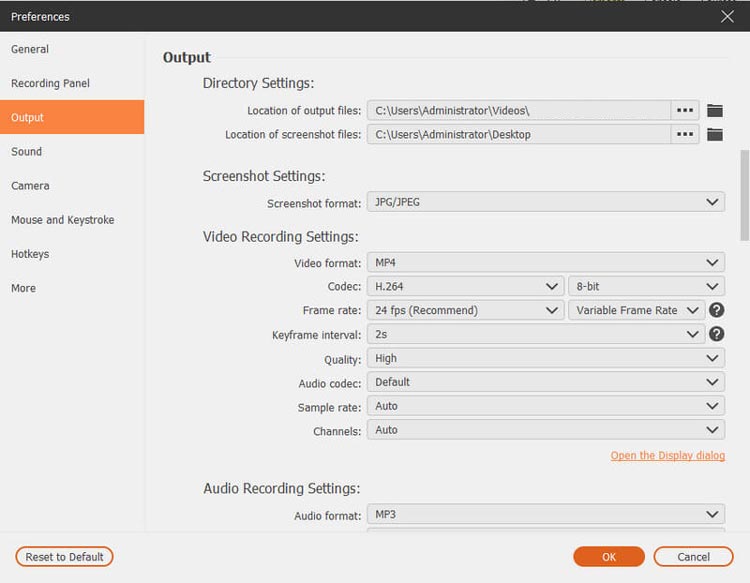
Output Settings
In the Output tab, you can designate a folder for temporary files, recordings, and screenshots. Additionally, you have the option to configure the format and quality of video/audio, select the video codec and frame rate, and specify the screenshot format.
Sound Settings
The Sound settings enable you to select audio sources, including System Sound and Microphone. You can also adjust the volume levels for both the system sound and microphone using the slider.
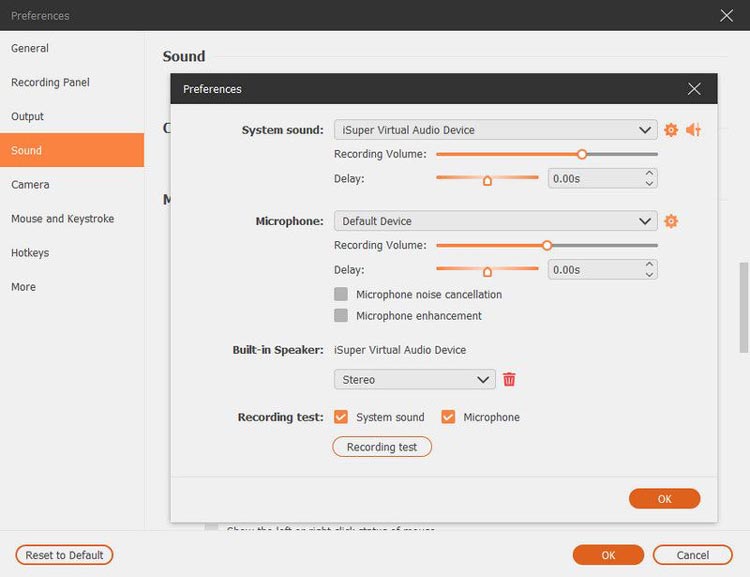
Furthermore, you can activate features like "Microphone noise cancellation" and "Microphone enhancement" to improve audio quality for recordings.
Before you start recording, you can conduct an audio test by clicking on the "Recording test" button. This will initiate a brief audio recording. To stop the recording, click the sound button next to the "Recording test," and click it again to listen to the playback.
Mouse Configuration
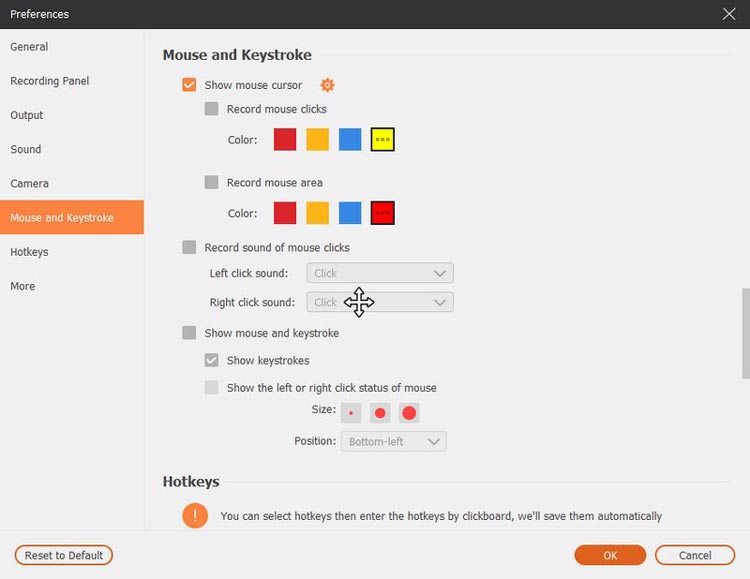
Within the Mouse section, you have the option to display the mouse cursor and flexibly adjust settings for mouse clicks and the clickable area.
Hotkeys Configuration
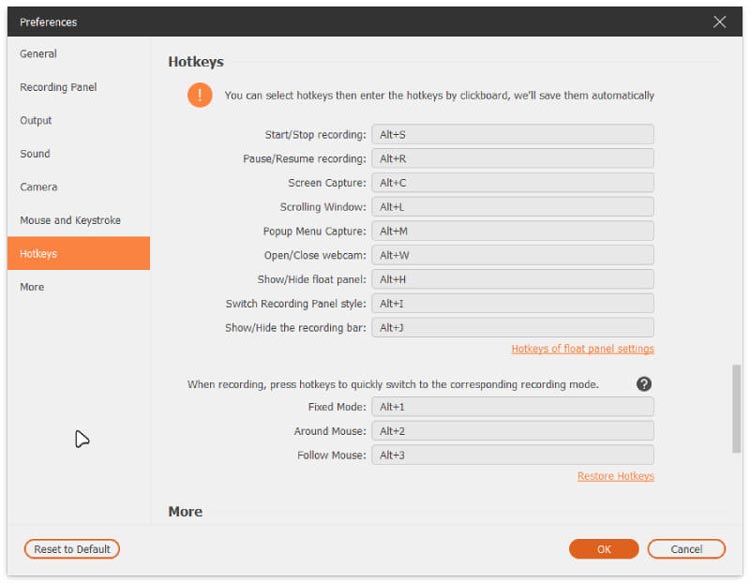
The Hotkeys tab allows you to set key combinations for various functions, including starting/stopping recordings, pausing/resuming recordings, capturing screens, opening/closing the webcam, and showing/hiding the floating panel.
More
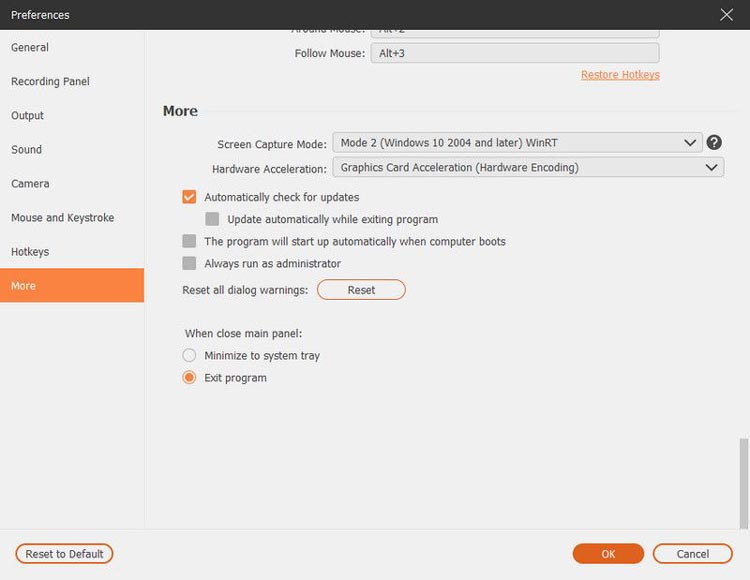
The More tab provides options to enable hardware acceleration, manage automatic updates, and access additional features.
Conclusion
With Screen Recorder, capturing high-quality screen recordings has never been easier. Whether you're recording gameplay, audio, or webcam sessions, this software provides all the tools you need for professional results.


