After upgrading to a new iPhone, you may need to import contacts to the iPhone. Importing contacts is an easy process, whether you want to import them from a SIM card, Android phone, Google Account, Outlook, CSV file, etc. We've provided 10 effective methods in this guide, enabling you to complete the contact migration with ease, and ensuring you're always connected with the people who matter most.
- Part 1: How to Import Contacts to iPhone from SIM
- Part 2: How to Import Google Contacts to iPhone
- Part 3: How to Import Contacts from Android/iPhone to iPhone
- Part 4: How to Import CSV Contacts to iPhone
- Part 5: How to Import Contacts to iPhone from VCF
- Part 6: How to import contacts from Excel to iPhone
- Part 7: How to Import Contacts from iCloud to iPhone
- Part 8: How to Import Outlook Contacts to iPhone
- Part 9: How to import Facebook contacts to iPhone
- Part 10: How to Import Contacts from Computer to iPhone
Part 1: How to Import Contacts to iPhone from SIM
If you're upgrading to an iPhone from another phone and want to transfer contacts from your SIM card, the process is simple.
Follow these steps:
Step 1: Insert your SIM card into your iPhone.
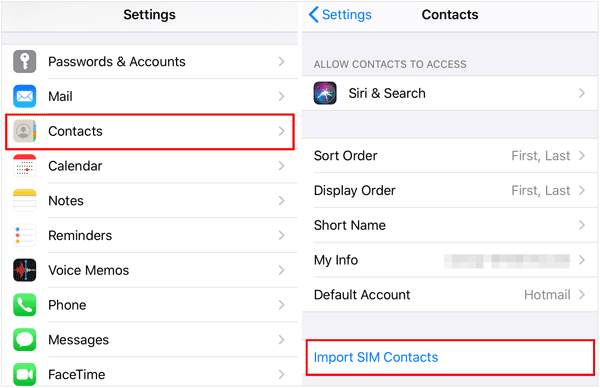
Step 2: Open the Contacts app or go to Settings > "Contacts".
Step 3: Tap on "Import SIM Contacts". Then your iPhone will begin importing the contacts saved on the SIM.
Step 4: Once completed, you'll find all your SIM contacts in the Contacts app.
Part 2: How to Import Google Contacts to iPhone
If you use Gmail or Google Workspace, syncing your Google Contacts is straightforward and keeps them updated automatically.
Here's how to import contacts from Gmail to an iPhone:
Step 1: Go to "Settings" on your iPhone.
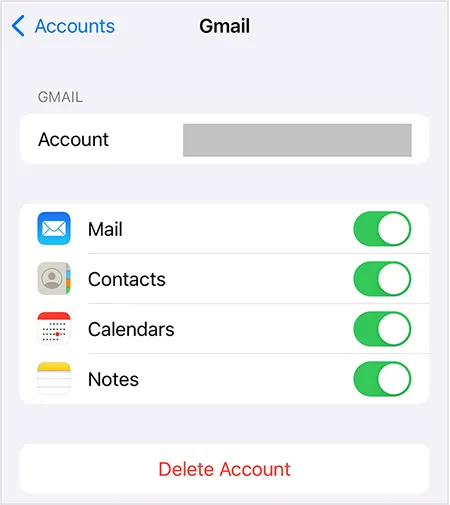
Step 2: Tap on "Mail" (or "Contacts" > "Accounts" in some iOS versions).
Step 3: Click "Accounts" > "Add Account" > "Google".
Step 4: Sign in with your Google Account credentials (email and password). You might need to complete two-factor authentication.
Step 5: Ensure the toggle switch for "Contacts" is turned ON (green). You can also enable Mail, Calendars, and Notes if desired. Then tap "Save". Your Google Contacts will now sync with the iPhone's Contacts app. Allow a few minutes for the initial sync to complete.
Part 3: How to Import Contacts from Android/iPhone to iPhone
If you're switching to iPhone from another iPhone or an Android phone, you have a few options to transfer your contacts.
3.1 Using Move to iOS (During Setup)
Move to iOS is an Apple app that helps you transfer contacts, messages, and more during the initial iPhone setup.
Here's how to import contacts to your iPhone from Android:
Step 1: Install and open Move to iOS on your Android phone.
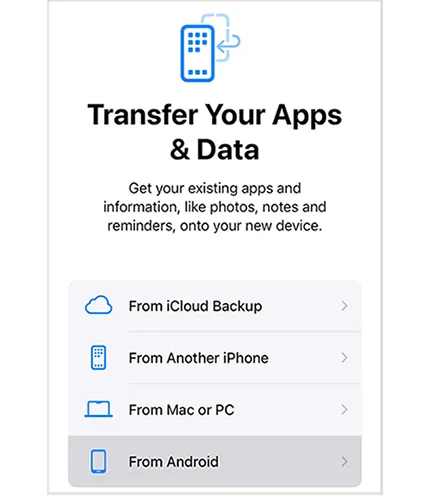
Step 2: Begin setting up your new iPhone. Proceed until you reach the "Transfer Your Apps & Data" screen, and select "From Android".
Step 3: Tap "Continue" on both devices. Agree to the terms on the Android device.
Step 4: On your iPhone, a code will appear. Enter this code on your Android device.
Step 5: Your Android device will connect to the iPhone via a temporary Wi-Fi network.
Step 6: Select the content you want to transfer – make sure Contacts is checked. Tap "Continue" or "Next" on the Android device and wait for the transfer to complete. Keep both devices close and powered on. Once finished on Android, tap Done. Continue setting up your iPhone.
Note: This method only works during the initial iPhone setup.
3.2 Using iReaShare Phone Transfer (After Setup)
If your iPhone is already set up, you can use iReaShare Phone Transfer to move contacts between phones. This tool is compatible with most Android and iOS devices, so you can import contacts from an Android device or iPhone to your target iPhone.
Main features of this data transfer software:
* Directly copy contacts from one Android or iOS device to another.
* The transferred contacts will not overwrite the current contacts on the destination iPhone.
* Transfer calendar events, Safari bookmarks, and books from iPhone to iPhone.
* Allow you to select file types before transferring them.
* Data transfer between Android devices is available.
* Support iOS 5.0 or later, and Android 6.0 or higher.
Download iReaShare Phone Transfer.
Download for Win Download for Mac
Here's how to import contacts from iPhone to iPhone:
Step 1: Install iReaShare Phone Transfer on your computer, and connect both your iPhones to the computer with USB.
Step 2: Tap "Trust" on both mobile devices, and then the software will recognize them. Make sure your target iPhone is the "Destination" device. If not, click "Flip".
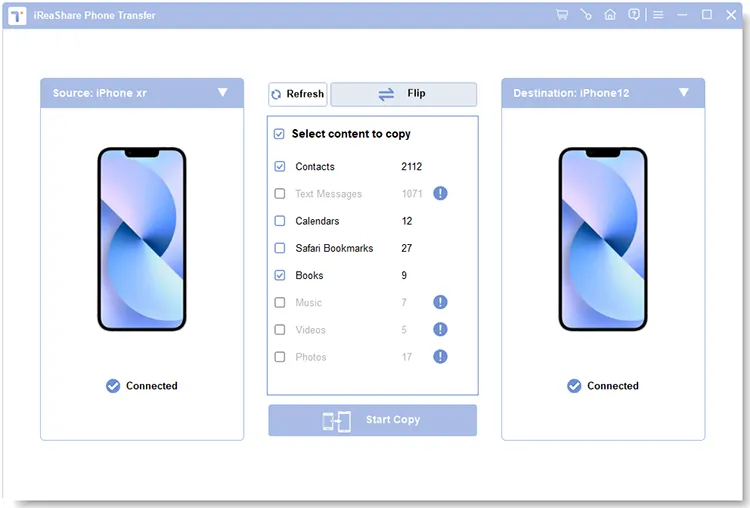
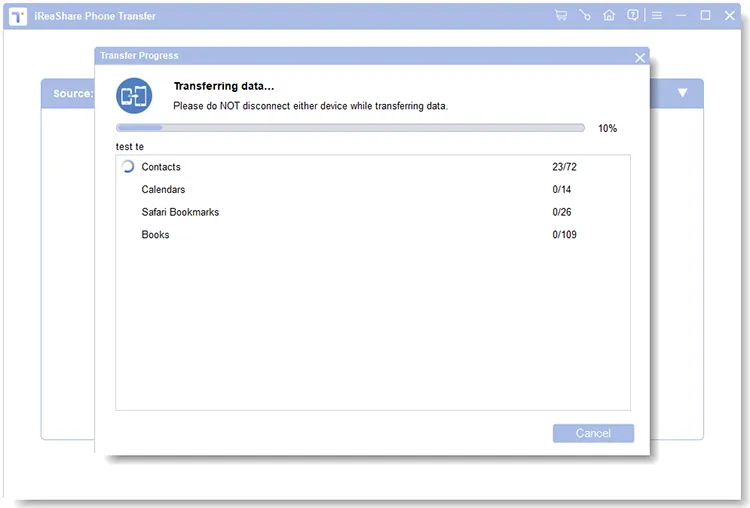
Step 3: Select "Contacts" and other data you want to transfer. Then click "Start Copy" to proceed. Your contacts will be imported to your destination iPhone.
3.3 Using AirDrop
For transferring contacts between two iPhones that are nearby, AirDrop is a quick wireless option, best suited for a few contacts rather than the entire address book.
Here's the guide:
Step 1: Ensure AirDrop is enabled on both iPhones (Control Center > Long-press network settings card > AirDrop > Contacts Only or Everyone). Also, make sure Wi-Fi and Bluetooth are on.
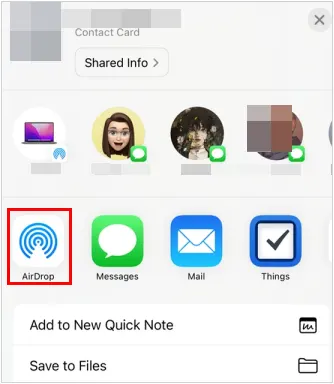
Step 2: On the source iPhone, open the Contacts app. Find and select the contact you want to share.
Step 3: Scroll down and tap "Share Contact". Tap "AirDrop", and tap the name/icon of the target iPhone when it appears.
Step 4: On the target iPhone, accept the incoming AirDrop. You'll be prompted to save the contact information.
Part 4: How to Import CSV Contacts to iPhone
Unfortunately, you cannot directly import CSV files to your iPhone, so you need to convert the CSV file to VCF first.
Here are the steps:
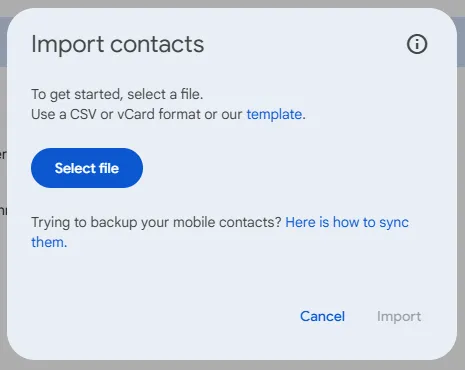
Step 1: Go to Google Contacts on your computer, and log in to your Google Account. Then click "Import" to select your CSV file.
Step 2: After that, select the contacts you imported just now, click "List settings" on the top right corner, and choose "Export" > "vCard for Android or iOS". Then the VCF file will be saved on your computer.
Step 3: Send the VCF file to your iPhone with email. Then open the email on your iPhone, and import your contacts to your iPhone.
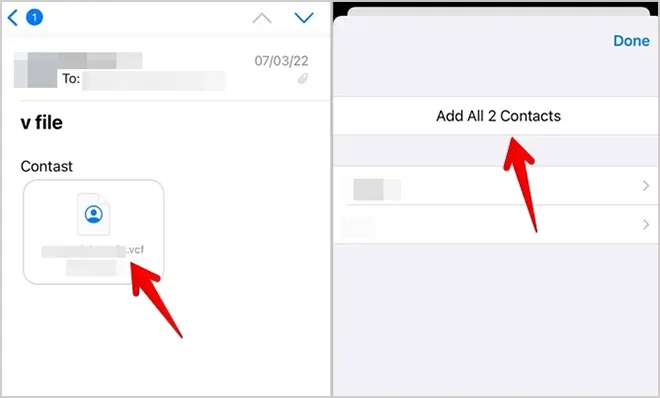
Part 5: How to Import Contacts to iPhone from VCF
It's easy to import contacts from a VCF file to an iPhone. You can utilize email, iCloud, or AirDrop, which can import a VCF file seamlessly.
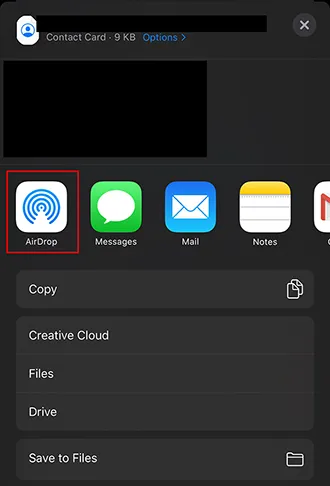
Import contacts from a VCF file to an iPhone via AirDrop:
Step 1: If your VCF file is on another iOS device or MacBook, you can AirDrop it directly. Please enable the AirDrop feature on both devices.
Step 2: Select the VCF file, and click "Share". Then choose "AirDrop" and your recipient device.
Step 3: Accept the VCF file on the receiver. You'll be prompted to save the contact information.
Part 6: How to import Contacts from Excel to iPhone
You cannot directly import an Excel file (.xls or .xlsx) to your iPhone Contacts. You must first convert the Excel file to a compatible format, typically VCF.
Here's how:
Step 1: Launch Microsoft Excel and open the Excel file that contains your contacts. Then click on the "File" tab in the top-left corner of the Excel window, and tap "Save As" > "CSV (Comma delimited) (*.csv)". It will be saved as a CSV file.
Step 2: Import the CSV file to your Google Contacts.
Step 3: Select the imported contacts on Google Contacts, and export them as a VCF file by clicking "Export" > "vCard for Android or iOS".
Step 4: Email the VCF file to yourself. Then log in to the same email account on your iPhone, and open the email.
Step 5: Touch the VCF file, and import the data to your iPhone.

Part 7: How to Import Contacts from iCloud to iPhone
This usually means enabling iCloud sync on your iPhone so that contacts already stored in your iCloud account appear on your device.
Follow the steps to import contacts from iCloud to an iPhone:
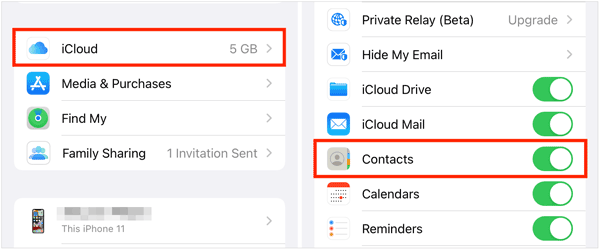
Step 1: Ensure you are signed in to your Apple ID on your iPhone.
Step 2: Go to Settings, and tap "[Your Name]" at the top. Then click "iCloud".
Step 3: Under "Apps Using iCloud", tap "Show All".
Step 4: Find "Contacts" and make sure the toggle switch is "ON" (green).
Step 5: If prompted to merge contacts, choose "Merge". This combines contacts on your device with those in iCloud.
Step 6: Your iPhone will now download and sync contacts stored in your iCloud account.
Part 8: How to Import Outlook contacts to iPhone
Similar to Google Contacts, you can sync contacts from an Outlook.com, Microsoft 365, or Exchange account.
Here's how:
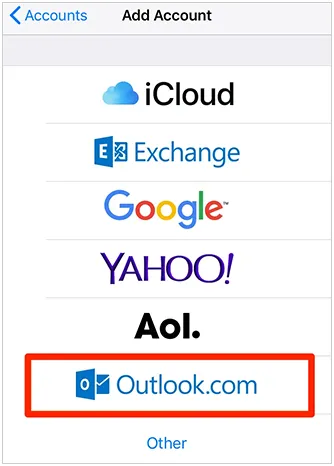
Step 1: Go to Settings on your iPhone, and click "Mail" > "Accounts" > "Add Account" > "Outlook.com" (for personal accounts) or "Microsoft Exchange" (for work/school accounts).
Step 2: Sign in with your Microsoft account credentials. Ensure the toggle switch for "Contacts" is turned "ON".
Step 3: Click "Save". Your Outlook contacts will sync to your iPhone's Contacts app.
Part 9: How to import Facebook contacts to iPhone
Directly syncing Facebook friends' contact information to your iPhone's Contacts app is no longer supported by Facebook or iOS due to privacy changes implemented several years ago.
Previous integrations that allowed this have been removed. You cannot automatically import your Facebook friends list as contacts into your iPhone's native Contacts app using built-in iOS or Facebook features. You would need to manually add contact details for your Facebook friends if you want them in your iPhone Contacts.
Part 10: How to Import Contacts from Computer to iPhone
You can transfer contact files (like VCF or CSV) stored on your computer or sync contacts from computer-based applications.
10.1 Using iReaShare iPhone Manager
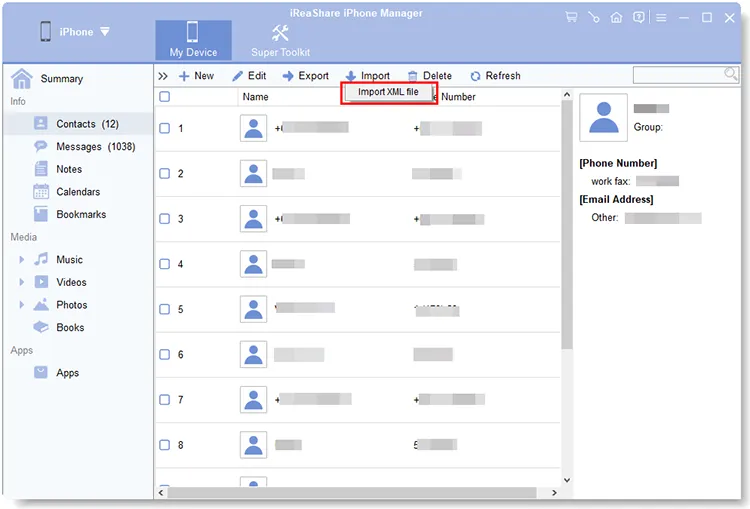
If you want to import contacts from XML files to your iPhone, please choose iReaShare iPhone Manager. It enables you to transfer all the contacts to your iPhone, iPad, iPod touch at one go. Also, you can back up your iPhone contacts to your computer with it. By the way, it also helps when you want to sync contacts from your iPhone to Mac.
Import contacts to an iPhone with this software:
Step 1: Download and install iReaShare iPhone Manager on your computer, and connect your iPhone via USB. Click "Trust" if prompted.
Download for Win Download for Mac
Step 2: Choose "Contacts", and click "Import" on the top menu bar. Then select your XML file.
Step 3: Click "Open" to import contacts to your iPhone.
10.2 Using Finder
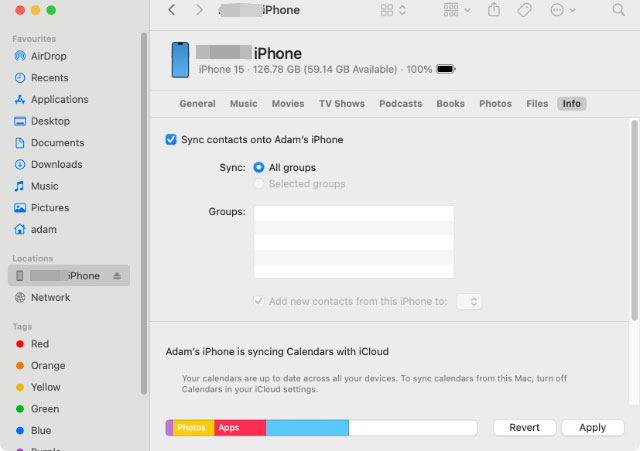
If you want to import contacts from Mac to an iPhone without downloading other applications, you can use the built-in Finder feature.
Here's how:
Step 1: Connect your iPhone to your Mac via USB.
Step 2: Open Finder, and select your iPhone from the sidebar under "Locations".
Step 3: Click the "Info" tab at the top (below your device name).
Step 4: Check the box for "Sync Contacts onto [Your iPhone Name]".
Step 5: Choose the source application from the dropdown menu (e.g., "Contacts" - the macOS Contacts app).
Step 6: Click "Apply" or "Sync" in the bottom-right corner.
Conclusion
As shown, numerous methods are available, catering to nearly every scenario. For seamless, continuous access, syncing with cloud services like iCloud, Google, or Outlook is often the best approach. But if you want to import contacts from your Android phone or iPhone directly, iReaShare Phone Transfer will be the best choice. You don't need to save your contacts as a file, which is more efficient than other methods.
Anyway, each method offers a simple solution depending on your needs, ensuring you can easily access your contacts no matter how you've stored them.
Download for Win Download for Mac
Related Articles
How to Transfer Data from One Phone to Another | 5 Easy Transfer Ways
Guide: How to Retrieve Deleted Contacts on iPhone Without Backup