Sometimes, we accumulate so many photos on our iPhones that it becomes necessary to get photos off our iPhone. Whether you need more space on your device or just want to back up your precious memories for safekeeping, you can get effective methods to take photos off your iPhone. You can select your best way to complete the task.
- Part 1: How to Get Photos off iPhone to PC/Mac via iReaShare iPhone Manager
- Part 2: How to Get Pictures off iPhone to PC via Windows Photos App
- Part 3: How to Take Photos off iPhone to Mac via USB Manually
- Part 4: How to Get All Photos off iPhone via iCloud
- Part 5: How to Take Pictures off iPhone via Google Photos
- Part 6: FAQs About Getting Photos off iPhone
Part 1: How to Get Photos off iPhone to PC/Mac via iReaShare iPhone Manager
If you want to quickly get photos off your iPhone and save them to your computer, iReaShare iPhone Manager will be your best choice. With it, you can directly preview thumbnails of your iPhone photos on your computer, freely select the images you want to transfer, and even use a one-click select-all option to save you time. Then, you can confidently delete the photos on your iPhone.
Main features of iReaShare iPhone Manager:
* Get photos off an iPhone and save them to a computer.
* Transfer photos with original quality to keep the image resolutions.
* Allow you to back up your iPhone photos to the default iTunes backup location on your PC.
* Transfer contacts, videos, messages, documents, and more from an iOS device to Mac/PC.
* Access various iOS data on a computer without iTunes.
* Support iOS 5.0 and upper, including iOS 18.
Download the iPhone Manager software.
Download for Win Download for Mac
How do I get photos off my iPhone? Here's the guide:
Step 1: Connect an iPhone to a computer with a USB cable, and make the iOS device trust the computer.
Step 2: Download and install the correct version of iReaShare iPhone Manager based on your computer's OS, and launch the program directly. Then it will quickly recognize the mobile device.
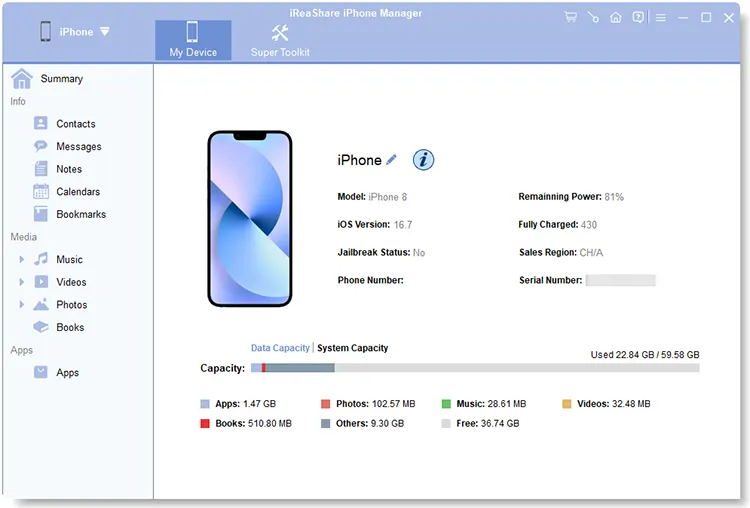
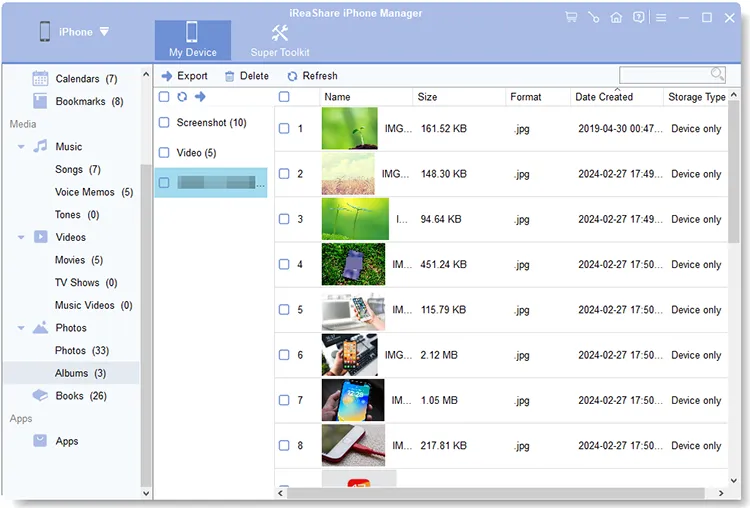
Step 3: Select the "Photos" option, and check the photos you want to transfer. Finally, click "Export" to save them to your Mac or Windows computer. Once done, you can delete the photos from your iPhone.
Part 2: How to Get Pictures off iPhone to PC via Windows Photos App
For Windows users, you can take photos off your iPhone to a Windows PC with the built-in Photos app on your computer. It allows you to import your photos directly.
Here's how:
Step 1: Link your iPhone to your PC with USB, and unlock your iPhone and tap "Trust This Computer" if prompted.
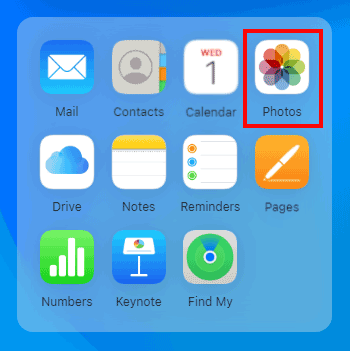
Step 2: Click the "Search" icon and type "Photos" to launch the Photos app.
Step 3: Click "Import" on the top right corner, and choose your iOS device.
Step 4: Select the photos you want to transfer, and start the process.
Step 5: After copying the photos to your PC, you can remove the pictures from your iPhone.
![]()
Part 3: How to Take Photos off iPhone to Mac via USB Manually
For Mac users, you can get photos off your iPhone to your Mac computer with USB, which is a straightforward process using the built-in Photos app or Finder.
Using the Photos app on Mac:
Step 1: Connect your iPhone to your Mac using a USB cable. Then click "Trust" if prompted on your iPhone.
Step 2: The Photos app on your Mac should automatically open. If not, you can launch it from your Applications folder.
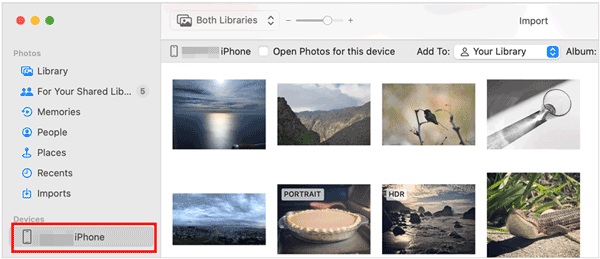
Step 3: In the Photos app, your iPhone will appear in the sidebar under "Devices". Click on it.
Step 4: You will see a preview of the photos on your iPhone. You can choose to "Import All New Items" or select specific photos and click "Import Selected".
Step 5: You can specify which library or album you want to import the photos into. Then the photos will be copied to your Mac's Photos library. Once done, remove them from your iPhone.
Using Finders to get photos off iPhone:
Step 1: Connect your iPhone to your Mac using a USB cable. Then unlock your iPhone and make it trust your Mac.
Step 2: Open a new Finder window on your Mac. Your iPhone will appear in the sidebar under "Locations". Please choose it.
Step 3: Navigate to the "Internal Storage" folder and then to the "DCIM" folder. This folder contains subfolders with your photos.
Step 4: Open the "DCIM" folder and drag and drop the desired photos or folders to a location on your Mac.
Part 4: How to Get All Photos off iPhone via iCloud
iCloud offers a seamless way to sync and access your photos across all your Apple devices, including your Mac and even a PC through the iCloud website or the iCloud for Windows app. You can wirelessly take your photos off your iPhone with it.
Here's how:
Step 1: On your iPhone, go to Settings > "[Your Name]" > "iCloud" > "Photos" and make sure "iCloud Photos" is turned on.
Step 2: Sync photos to Mac or PC.
- If you have iCloud Photos enabled on your Mac (System Settings/Preferences > Apple ID > iCloud > Photos), your photos will automatically download to your Mac's Photos app when it's connected to the internet.
- On your PC, open a web browser and go to iCloud.com. Sign in with your Apple ID. Click on the "Photos" icon. You can then browse, download, and manage your photos from the iCloud website.
Part 5: How to Take Pictures off iPhone via Google Photos
Google Photos is another popular cloud-based service that allows you to back up and access your photos across various devices. You can use it to get your photos off your iPhone through a network.
Here are the steps:
Step 1: Download the Google Photos app from the App Store on your iPhone and install it.
Step 2: Open the Google Photos app and sign in with your Google Account. Follow the prompts to enable backup. You can choose the backup quality (Original or Storage saver).
Step 3: On your PC or Mac, open a web browser and go to photos.google.com. Sign in with the same Google Account you used on your iPhone.
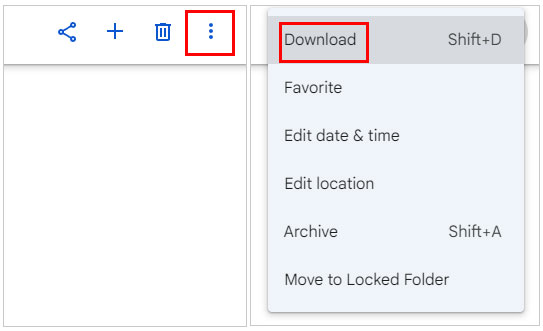
Step 4: Select individual photos or multiple photos and click on the three dots in the top right corner and choose "Download" to save them to your computer.
Part 6: FAQs About Getting Photos off iPhone
Q1: Is iTunes available to transfer photos from my iPhone to my computer?
While iTunes for Windows is still available for some functions like podcasts and audiobooks, it is not the recommended way to transfer photos. Apple has released a dedicated app called Apple Devices (available on Windows 10 and 11) which is designed for managing and syncing your iPhone and iPad, including transferring photos.
Q2: How can I transfer a large number of photos from iPhone to PC quickly?
Using software like iReaShare iPhone Manager or iCloud to sync photos in bulk is a good option for transferring large quantities quickly. Another method is transferring through the Photos app in Windows.
Q3: Why don't some of my iPhone photos show up on my PC?
This could be due to:
- Different formats of photos (e.g., HEIC vs JPEG).
- Not enabling "iCloud Photos" or "iCloud Backup" on your iPhone.
- Connection issues between your iPhone and PC.
Conclusion
It's straightforward to get photos off an iPhone once you know your options. If you want more control for your iPhone photos and other data, you can choose iReaShare iPhone Manager. This software supports data transfer and management. Simply put, choose the one that works best for your needs and preferences, and keep your photos safe and organized.
Download for Win Download for Mac
Related Articles
Effortlessly Back Up Messages to iCloud on iPhone in 2025 (New Guide)
How to Transfer Videos from Phone to Computer (Android and iPhone)