USB drives are incredibly convenient for storing and transferring data. However, there may come a time when you need to erase all the data on a USB drive, whether it's to prepare it for a new use, to remove sensitive information, to troubleshoot issues, or to get rid of an old USB drive. If you want to erase an USB drive on a Windows PC, Mac, and Chromebook, continue to read.
Part 1: How to Erase USB Drive on Windows PC
To wipe a USB drive on a Windows computer with ease, we've provided 3 effective and safe methods. You can choose the method that best suits your needs.
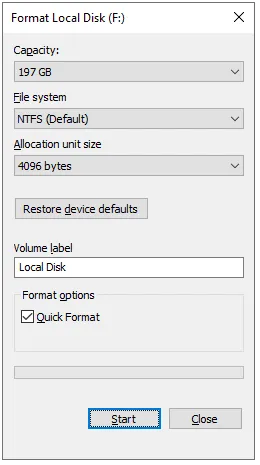
1.1 Using Quick Format
Quick formatting is the simplest way to erase data from your USB drive. This method removes the file system and makes the space available for new files, but it does not completely wipe out the data on the device.
Here's how:
Step 1: Insert your target USB drive into your PC, and open "This PC".
Step 2: Right-click on the USB drive and select "Format".
Step 3: In the "Format" dialog, check the option for "Quick Format".
Step 4: Click "Start", and confirm the action.
1.2 Using iReaShare Data Wipe
If you want to wipe your USB drive thoroughly, including erase all the deleted data, please try iReaShare Data Wipe. This dedicated software can erase data from external devices, so you can connect your USB drive to your PC, and then use this eraser to wipe your flash drive. By the way, you can also use it to wipe your local hard drive on your Windows computer.
Main features of this USB drive eraser:
* Automatically detect and recognize your connected USB flash drive.
* The Quick Erase mode can wipe all existing files from your flash drive.
* The Deep Erase mode can wipe both existing and deleted data permanently.
* Enable you to securely erase specific files from your USB drive.
* Support Windows 11/10/8/7.
Download this drive wiper.
Here's how to erase a USB drive with this drive wiper:
Step 1: Download and install iReaShare Data Wipe on your PC, and open it.
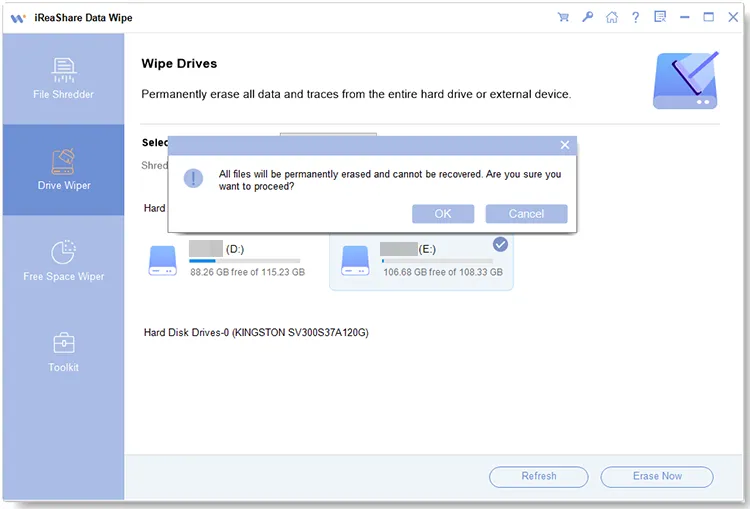
Step 2: Choose the "Drive Wiper" feature on the left side. Then select an erasing level and your USB drive.
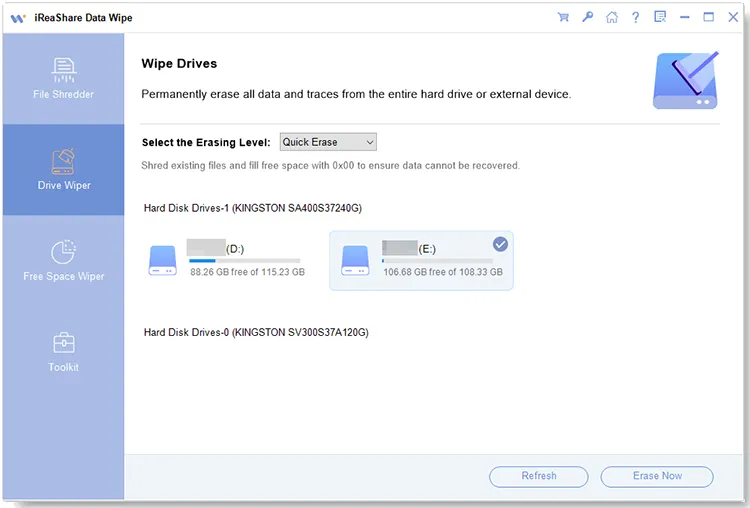
Step 3: Tap "Erase Now" and "OK" to proceed. The software will erase your flash drive immediately. Once done, all your data on your drive will be removed permanently.
1.3 Using DiskPart
You can also use DiskPart to erase your USB flash drive. This built-in tool in Windows allows you to manage disks and partitions. As long as you enter the correct commands, you can wipe your external drive.
Steps to erase the USB drive with DiskPart:
Step 1: Press "Windows" and "R", type "cmd", and hit "Enter" to open "Command Prompt".
Step 2: Input "diskpart" and press "Enter" to launch DiskPart. Then input "list disk", and tap "Enter".
Step 3: Identify the USB drive from the list, then type "select disk X". Please replace "X" with your USB drive number.
Step 4: Type "clean" and press "Enter" to erase the drive. Once done, input "exit" to close DiskPart.
Part 2: How to Wipe USB Drive on Mac via Disk Utility
On a Mac computer, the easiest way to erase a USB drive is using Disk Utility. This tool offers a simple, built-in way to format and erase drives securely.
Here's the guide to erase a USB drive on Mac:
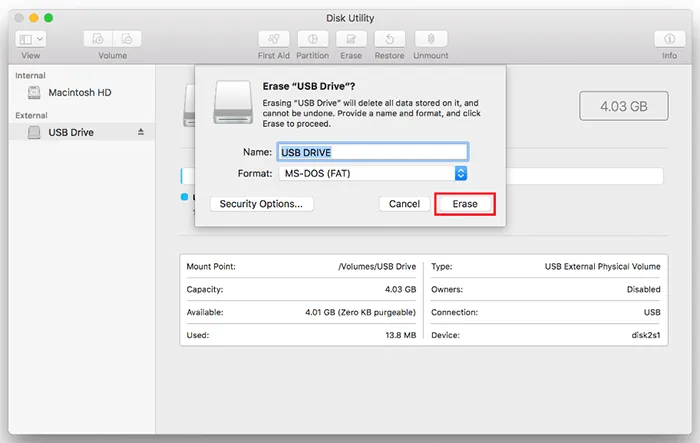
Step 1: Insert the USB drive into your Mac, and open "Applications" > "Utilities" > "Disk Utility".
Step 2: In the sidebar, select your USB drive. Then click "Erase" at the top.
Step 3: Choose a format (e.g., macOS Extended, exFAT, or FAT32) and a scheme (e.g., GUID Partition Map, Master Boot Record).
Step 4: Click "Erase" to confirm. This will erase all data from the USB drive and prepare it for reuse.
Part 3: How to Clear a USB Drive on Chromebook via Files App
If you're using a Chromebook, the process of clearing a USB drive is straightforward and can be done through the Files app.
Here's how to clear a USB drive on Chromebook:
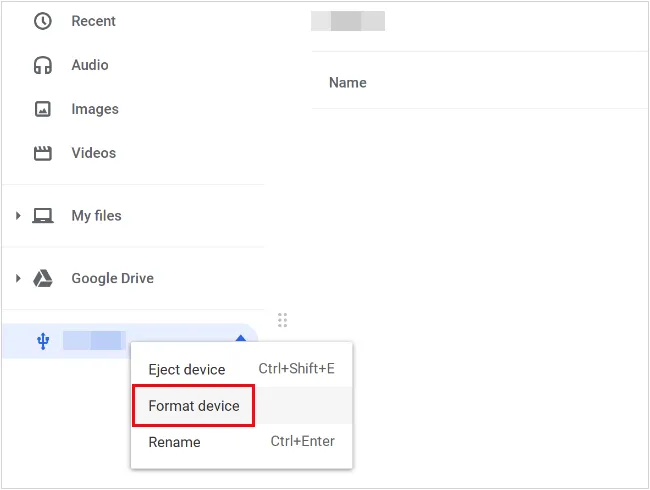
Step 1: Insert the USB drive into your Chromebook, and open the Files app.
Step 2: Right-click on the USB drive and select "Format device".
Step 3: Choose the appropriate file system for your needs (e.g., FAT32 or ExFAT for compatibility).
Step 4: Confirm the format by clicking "OK". Then the USB drive will be wiped and formatted for use on your Chromebook.
Part 4: FAQs About Erasing USB Drive
Q1: What is the difference between deleting and erasing data on a USB drive?
Deleting files removes them from the directory, but they remain on the drive until overwritten. Erasing data, or performing a secure wipe, overwrites the data multiple times, ensuring that it is unrecoverable.
Q2: How do I safely erase a USB drive without damaging it?
To safely erase a USB drive, always use software designed for secure data deletion. Avoid physically damaging the drive by ensuring the erasure process is completed properly, and never interrupt the process.
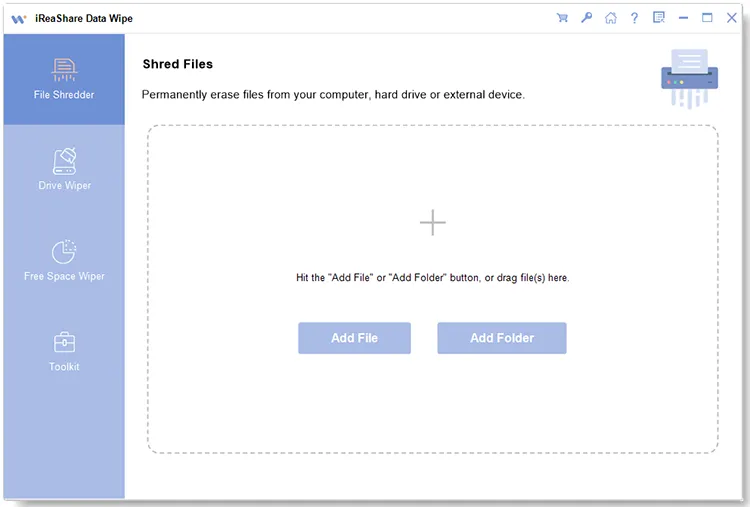
Q3: Can I erase only some files on a USB drive?
Yes, you can erase specific files using iReaShare Data Wipe on your Windows computer. Choose the "File Shredder" feature, and you can shred and completely erase your selected files and folders.
Conclusion
Erasing a USB drive is a simple process, but it's important to choose the right method depending on your needs. Despite the operating system on your computer, you can now get a suitable and practical solution to wipe your USB drive. For those looking for extra security and using Windows PCs, software like iReaShare Data Wipe provides a more secure and effective solution for permanently wiping data. Always ensure that you've backed up any important data before proceeding with these methods.
Related Articles
How to Erase iPhone Data Permanently with iReaShare iPhone Data Eraser
Completely Wipe Android Phone with 2 Reliable Methods